- За допомогою phpMyAdmin
- Використовуючи команди MySQL безпосередньо
- За допомогою MySQL Administrator
- Getting MySQL Admin
- Backing Up the Database
- Відновлення з резервної копії
- Використовуючи плагін WordPress Database Backup
- установка плагіна
- Резервне копіювання
- Відновлення даних
- використовуючи CocoaMySQL
Languages : English • 日本語 Русский • ( Add your language )
Настійно рекомендується архівувати базу даних на регулярній основі і перед оновленням блогу.
У цьому випадку стає можливим відновити базу даних з резервної копії , Якщо щось піде не так.
За допомогою phpMyAdmin
phpMyAdmin - це програма для виконання операцій з базою даних.
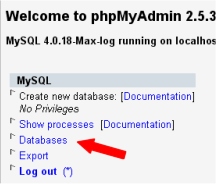
- Увійдіть в інтерфейс phpMyAdmin на вашому сервері
- На головній сторінці виберіть 'Бази даних' ( 'Databases')
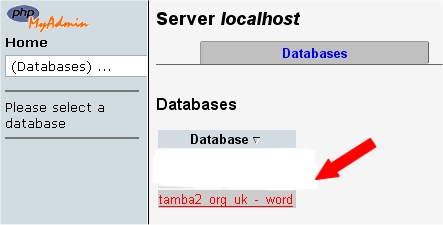
- Клацніть на ім'я вашої бази даних - точніше, бази даних вашого WordPress, якщо у вас їх декілька.
- Наступний екран покаже вам все таблиці всередині бази.
Ігноруйте це і натисніть на закладку 'Експорт' ( 'Export') у верхній частині екрану. - Зверніть увагу на ліву верхню частину секції 'Експорт' ( 'Export'). Всі таблиці, які ви вибрали з вашої бази, відображаються в цій секції.

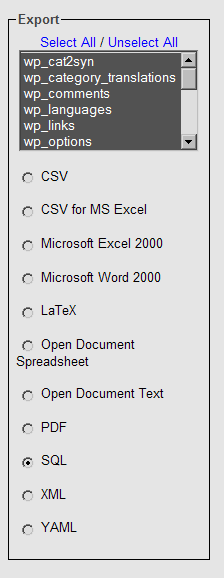
- Якщо у вас є інші програми, що використовують базу, тоді виберіть тільки ті таблиці, які відносяться до вашої установці wordpress'a. Їх назви починаються з "wp_" або якось ще 'префікс_табліци' ( 'table_prefix') які ви задали в файлі 'wp-config.php'.
- Якщо ж у вас встановлений тільки блог WordPress, то залиште все як є (або натисніть 'Вибрати все' ( 'Select All') якщо ви змінили свій вибір)
- Обов'язково переконайтеся, що вибрано 'SQL'!
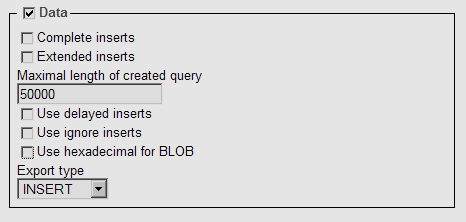
Tick the following boxes:
- 'Structure'
- 'Add DROP TABLE'
- 'Add AUTO_INCREMENT' and
- 'Enclose table and field names with backquotes'
Leave the boxes inside this section unticked, but make sure to keep the checkbox next to the "DATA" heading checked.
Depending on the database size, this may take a few moments.
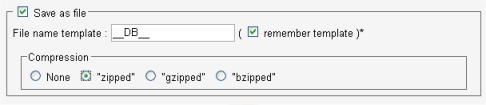
If you wanted, you could download a backup in each of the compression formats. Your choice. For example: None and "zipped": 
Remember
- you have NOT backed up the files and folders - such as images - but all your posts and comments are now safe .
Використовуючи команди MySQL безпосередньо
phpMyAdmin не справляється з великими базами даних, в цьому випадку допоможе використання MySQL безпосередньо.
1. Перейдіть в директорію, в яку ви хочете зберегти бекап:
user @ linux: ~> cd files / blog
2. Використовуйте команду mysqldump для вивантаження всіх таблиць бази даних. Щоб вивантажити тільки деякі таблиці з бази даних, вкажіть їх імена в кінці команди як (ім'я_таблиці ім'я_таблиці ім'я_таблиці), тільки не вводьте круглі дужки (). (За більш детальним описом, зверніться до man mysqldump.):
user @ linux: ~ / files / blog> mysqldump --add-drop-table -h mysqlhostserver -u mysqlusername -p databasename (tablename tablename tablename) | bzip2 -c> blog.bak.sql.bz2 Enter password: (введіть ваш пароль mysql) user @ linux ~ / files / blog> Приклад: mysqldump --add-drop-table -h db01.example.net -u dbocodex - p dbwp | bzip2 -c> blog.bak.sql.bz2 Enter password: my-password user @ linux ~ / files / blog>
Команда bzip2 -c після | (Pipe, конвеєр) означає, що бекап буде стиснутий на льоту, а> blog.bak.sql.bz2 відсилає висновок bzip в файл під назвою blog.bak.sql.bz2. Те ж саме можна зробити за допомогою двох послідовно виконаних команд:
mysqldump --add-drop-table -h db01.example.net -u dbocodex -p dbwp> blog.bak.sql bzip2 blog.bak.sql
За допомогою MySQL Administrator
MySQL Administrator is a program for performing administrative operations, such as configuring your MySQL server, monitoring its status and performance, starting and stopping it, managing users and connections, performing backups, restoring backups and a number of other administrative tasks. You can perform most of those tasks using a command line interface such as that provided by mysqladmin or mysql , But MySQL Administrator is advantageous in the following respects:
- Its graphical user interface makes it more intuitive to use.
- It provides a better overview of the settings that are crucial for the performance, reliability, and security of your MySQL servers.
- It displays performance indicators graphically, thus making it easier to determine and tune server settings.
- It is available for Linux, Windows and MacOS X, and allows a remote client to backup the database across platforms. As long as you have access to the MySQL databases on the remote server, you can backup your data to wherever you have write access.
- There is no limit to the size of the database to be backed up as there is with phpMyAdmin.
MySQL Administrator is designed to work with MySQL servers versions 4.0 and above.
Getting MySQL Admin
MySQL Admin may be downloaded from the MySQL.Com site . Installation binaries and documentation may also be found there.
Backing Up the Database
This assumes you have already installed MySQL Admin and set it up so that you can login to the MySQL Database Server either locally or remotely. Refer to the documentation that comes with the installation package of MySQL Admin for your platform for installation instructions.
1. Open the MySQL Admin client and login as you had previously set up to do.
2. From the icon menu on the left hand side of the client window select Backup.
3. If you have not already created a Backup Project, do this now by clicking on the "New Project" button at the lower part of the window and type in a name for the Backup Project where prompted.
4. Select one or more databases that you want to Backup (in the MySQL Admin client these are called a "Schema" (pl. "Schemata")). Add them to the Backup Content window on the right using the right-pointing arrow button.
5. When you have selected the Schema (ta), you can save the Backup Project. Or you may simply choose to Backup Now using the button on the lower right of the window.
6. A dialogue will come up asking you where to put the Backup. Enter the pathname or browse to the location using the dialogue.
7. Assuming all is correct (and you have write permissions in the directory to which you are writing the Backup), the backup will complete shortly.
Відновлення з резервної копії
1. Open the MySQL Admin client and login as you had previously set up to do.
2. From the icon menu on the left hand side of the client window select Restore.
3. Click the "Open Backup File" button on the lower right of the window.
4. Type in or browse to the Schema (ta) backup file and select. Click "Open".
5. The Target Schema (ta) will most likely be the "Original Location", or you may choose an alternate location using the drop-down menu.
6. Click the "Start Restore" button on the lower right of the window. The database restore will commence.
Використовуючи плагін WordPress Database Backup
Austin Matzko підтримує плагін originally created by Skippy під назвою WordPress Database Backup . Він входив до складу WordPress 2.0, але з версії 2.1 більше не поставляється.
установка плагіна
- If you do download the plugin, follow the directions in the wp-db-backup.txt file to install the plugin correctly.
Активація плагіна
- Make sure the wp-content folder is writeable by your server (change its CHMOD)
- Go to your Administration > Plugins > Plugins Panel and activate the plug-in
Резервне копіювання
- Navigate to Administration > Manage > Backup Panel
- Select any tables, in addition to the core WordPress tables, that should be backed-up. Select the Backup Options; the backup can be saved on the server, downloaded, or emailed. Finally, click on the Backup button to actually perform the backup. If you have installed the WP-Cron plugin , You can schedule daily backups.
Відновлення даних
The file created is a standard SQL file. If you want information about how to upload that file, look at Restoring Your Database From Backup .
використовуючи CocoaMySQL
CocoaMySQL is a free MySQL client for Mac OS X.
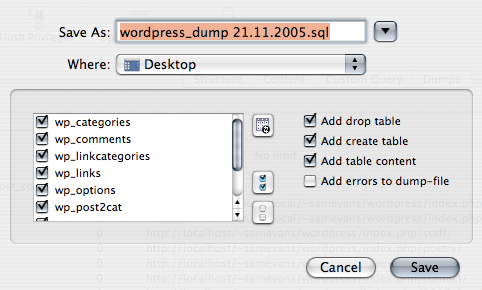
Open your database from CocoaMySQL and choose File → Export → MySQL file ..., and check these options:
- Add drop table
- Add create table
- Add table content